Before you start
Start with DualSense on PS5 or Xbox Wireless Controller on Xbox Series X|S. Check that the sticks return to rest, your grip is comfortable and firmware is current. Photograph the original settings so you can undo an experiment. A premium controller does not increase game frame rate.
Set up your PS5 controller
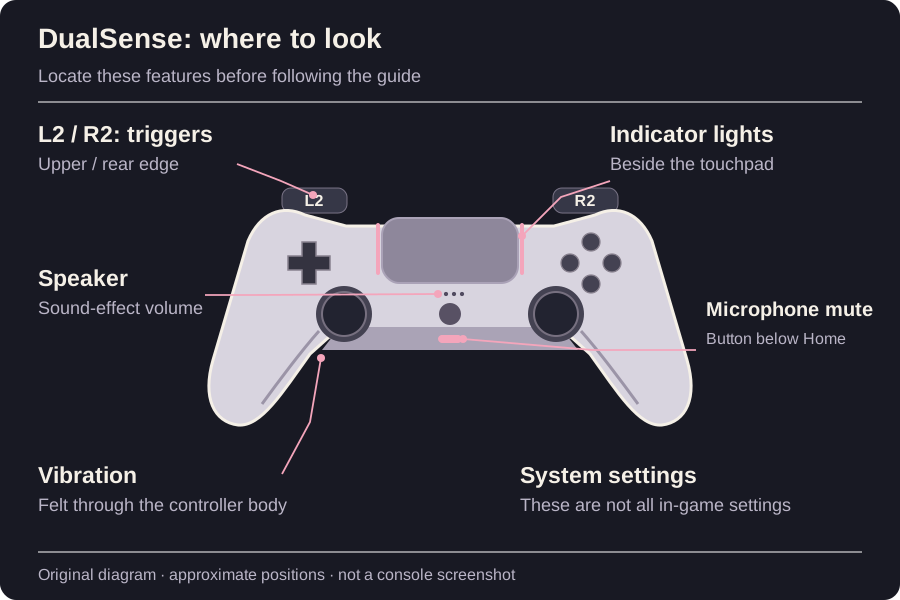
This changes brightness, not a freely chosen light-bar colour. Game and system indicators can behave differently.
- Settings
- Accessories
- Controller (General)
- Brightness of Controller Indicators
Open controller settings
From the PS5 home screen, open Settings, then Accessories and Controller (General).
Adjust brightness
Open Brightness of Controller Indicators and choose a lower available level.
For evening play, begin with the lowest available level and raise it if indicators become hard to see.
Return to play and check whether the light is less distracting while controller status remains readable.
If you cannot find it or it does not work
On Edge, look under Settings > Accessories > DualSense Edge Wireless Controller. Do not expect a colour picker or every light to turn off.
PS5: lower or mute the controller speaker
- Settings
- Sound
- Volume
- Controller Speaker
Find speaker volume
Open Settings > Sound > Volume, then select the controller speaker control.
Choose a level
Lower the slider; use its minimum to silence the controller speaker.
Start low, or at minimum with headphones. Increase it only if you want the extra speaker effects.
Use a game that sends effects to the controller speaker and check that its volume changed.
If you cannot find it or it does not work
Also available at Accessories > Controller (General) > Volume (Speaker for Controller). This does not mute the mic or TV.
PS5: make vibration comfortable
- Settings
- Accessories
- Controller (General)
- Vibration Intensity
Find vibration
Open the general controller settings and select Vibration Intensity.
Change one level
Keep the original value as your reference; try less feedback if it distracts you or causes discomfort.
Begin at the default and reduce it for comfort. No particular intensity has a measured GTA VI advantage here.
Repeat an action with feedback in a compatible game and compare comfort rather than assuming a speed improvement.
If you cannot find it or it does not work
Check the game’s vibration option too. Edge stores this adjustment per profile; confirm the active profile.
PS5: adjust adaptive trigger effects
- Settings
- Accessories
- Controller (General)
- Trigger Effect Intensity
Open trigger intensity
Select Trigger Effect Intensity in the general controller settings.
Try less resistance
If tiring, lower the effect and repeat the same action in a game that supports it.
Start at the default and reduce it if uncomfortable. Keep full physical travel when practising gradual throttle or braking.
Compare the supported effect during the same action. Disabling it is not presented as a measured latency improvement.
If you cannot find it or it does not work
Not every game uses adaptive effects. Edge manages intensity per profile; its physical trigger stops are a separate adjustment.
PS5: mute the microphone without silencing the game
- PS button
- Mic
- Microphone settings
Mute the microphone
Press the controller mute button once to mute or unmute the mic. Holding it instead also mutes sound output, including speakers.
Choose your input
Press PS, open Mic and its settings. Select the microphone you use and adjust its level while speaking normally.
Set your sign-in preference
For a quiet start, set Microphone Status When Logged In to Mute. Unmute deliberately when you want to talk.
Start muted. For voice chat, adjust the level until normal speech reaches the indicated good range.
Check the mute indicator and input meter before a chat. Select the headset mic if that is your intended input.
If you cannot find it or it does not work
If sound disappeared after holding mute, press the button again to restore the previous state. Controller-speaker volume is a different control.
PS5: confirm that USB carries the controller connection
- Settings
- Accessories
- Controller (General)
- Communication Method
- Use USB Cable
Connect a data cable
Connect DualSense to PS5 with a compatible USB data cable, not a charge-only cable.
Select the method
Open Communication Method and choose Use USB Cable. Use Bluetooth keeps wireless communication active even with a cable attached.
Use a cable if you prefer it or are diagnosing wireless dropouts. USB has not been measured as universally faster here.
Reopen the menu and confirm Use USB Cable remains selected; check whether the original dropout recurs.
If you cannot find it or it does not work
Try another data cable or USB port, update controller software and check the connector. Return to Bluetooth if the cable is inconvenient.
Set up your Xbox controller
- Settings
- Accessibility
- Night mode
- Controller brightness
Open Night mode
Open console Settings > Accessibility > Night mode.
Choose controller brightness
Open Controller brightness and reduce the available level. Power button brightness is the separate console-light setting.
Check the schedule
Check whether Night mode is scheduled so you know when its settings apply.
For dark-room play, begin at a low level that still lets you identify controller status.
Look at the controller’s Xbox button while the relevant Night mode settings are active.
If you cannot find it or it does not work
Check the schedule, controller support and firmware. Documented versions also provide access through TV & display options.
Xbox: standard-controller vibration versus Elite adjustments
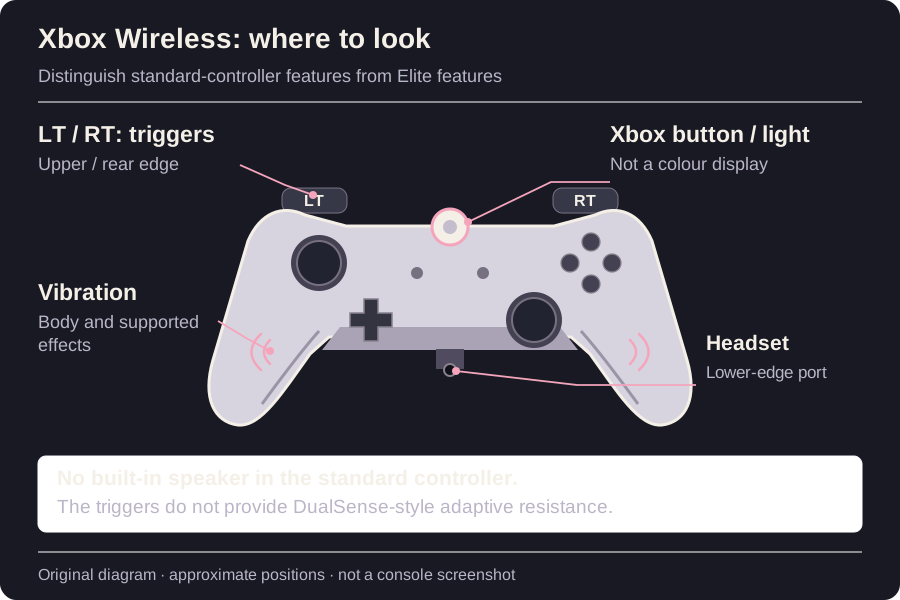
Standard Xbox Wireless Controller and Elite Series 2 do not expose identical controls. Do not look for Elite motor-intensity sliders on a standard pad.
- Settings
- Devices & connections
- Accessories
- Your controller
- Configure
Select your controller
Open Accessories from Devices & connections, or launch Xbox Accessories. Select the correct controller and choose Configure.
Use your model’s controls
On a standard pad, look for its vibration enable/disable control. Elite Series 2 supports motor adjustments through the app and its profiles.
Read the current screen
The final control, profile editor and labels vary with controller and firmware. This documentation review does not verify a fixed final submenu on a current console.
Keep vibration enabled initially; disable it if distracting. On Elite, reduce feedback gradually rather than changing every motor at once.
In a game with vibration enabled, repeat an action that produces feedback. Confirm the controller and active profile.
If you cannot find it or it does not work
Update the app and controller if a control is missing, then consult model-specific official help. Check the game too; do not assume an intensity slider must exist.
Xbox: adjust headphones, not a controller speaker
The standard Xbox controller has no game-effects speaker like DualSense. Its 3.5 mm socket carries headset audio; there is no equivalent controller-speaker volume.
- Connect your headset
- Xbox button
- Audio & music
Connect the headset
Fully insert a compatible wired headset’s 3.5 mm plug. Follow the manufacturer’s instructions for wireless or USB models.
Open audio controls
Press Xbox and open Audio & music. Adjust the headset controls offered for that device, or its own volume control.
Begin at a low, comfortable volume. Locate the headset’s mic mute before entering chat.
Check game audio and chat separately. Ensure a headset control is changing the headset rather than the TV.
If you cannot find it or it does not work
Sliders depend on device and connection. Reconnect the plug and check hardware mute/volume controls; consult the manufacturer if console controls are unavailable.
Xbox: distinguish trigger vibration from physical stops
Impulse-trigger vibration is not DualSense-style adaptive resistance. Standard Xbox Wireless Controller has no Elite trigger-stop switches. Elite Series 2 stops shorten physical travel; adjustable stick tension is a different feature.
- Check controller model
- Elite Series 2 only: rear trigger-stop switches
Identify the hardware
On a standard Xbox controller, retain normal travel; there is no adaptive-resistance console setting to match DualSense.
Set an Elite stop deliberately
Move Elite Series 2’s rear stop switches to change travel. It recognises stop changes without requiring an app change each time.
Use full travel first for gradual throttle and braking. Try shorter travel only where it feels useful for an action.
Check partial throttle and braking control, then compare the other action you wanted to improve.
If you cannot find it or it does not work
Restore full travel if analogue control becomes awkward. Separate stop position, vibration intensity and stick tension.
Xbox: choose a reliable connection
Official Xbox controllers use Xbox Wireless or USB to connect to Xbox consoles. Bluetooth in the specifications covers compatible PCs and mobile devices; it does not make the console link Bluetooth. Resolve dropouts and update firmware before tuning aim.
- Xbox controller
- Xbox Wireless or compatible USB data cable
Establish a baseline
Use the normal paired connection and check battery condition.
Compare a cable if needed
Connect a suitable USB data cable for troubleshooting, then repeat the situation that caused disconnections.
Choose the stable, comfortable connection for your room. USB is not promised to always lower latency.
Check for disconnects in the same situation without changing several variables.
If you cannot find it or it does not work
Try a known-good data cable and another USB port; consult official support if still unreliable.
Find a comfortable response in play
Keep the original profile and change one setting at a time. Once GTA VI is available, use its actual menus; do not treat GTA V option names or values as confirmed.
- Original profile
- Repeatable practice scene
- One small change
Repeat a simple task
Try a slow camera movement, a controlled turn and tracking a reference while moving.
Compare one change
If repeatedly overshooting, try slightly less sensitivity. If tracking needs uncomfortable movement, try a small increase. Separate look and aiming controls if offered.
Keep the default as a reference. There is no universal GTA VI sensitivity number here.
Repeat the task and note whether tracking or comfort improved.
If you cannot find it or it does not work
Restore the baseline if the benefit is unclear. Check display Game mode if the entire system feels slow.
Find a stable deadzone
A deadzone ignores a small area of stick movement. Too small a value can expose unwanted movement at rest. Edge has profile-based stick tuning; Elite offers sensitivity curves. Standard pads do not necessarily expose these controls.
- Available game or controller stick setting
- Rest test
- Fine-movement test
Use one adjustment layer
Change either the game setting or a controller profile first, rather than both together.
Test rest and movement
If adjustment exists, reduce it cautiously, leave sticks untouched, then try deliberate small movements.
Aim for a small, stable setting rather than the lowest possible number.
The camera should stay still untouched and respond predictably to deliberate movement.
If you cannot find it or it does not work
Increase the value if unwanted movement appears. A large deadzone can hide drift but cannot repair worn hardware.
Save a profile you can explain
For Edge: Settings > Accessories > DualSense Edge Wireless Controller > Custom Profiles. For Elite, use Xbox Accessories; Series 2 stores three custom profiles plus the default.
- Supported profile editor
- Descriptive name
- Keep the default
Name the purpose
Use a name such as Comfortable feedback and record what changed.
Check conflicts
Test the active profile against game controls before assigning more buttons.
Begin with one or two useful remaps and preserve a baseline profile.
Switch back and forth; confirm the active profile and which actions changed.
If you cannot find it or it does not work
Restore the default if inputs behave unexpectedly; check game and device mappings.
Sources & editorial notes
Documentation-based guide, reviewed November 3, 2026; not a hands-on console test. GTA VI has not been released. Starting recommendations are editorial suggestions, not measured GTA VI settings. Menu names can change with system language or firmware; illustrations are explanatory diagrams, not console screenshots.
Sony — PS5 controller settings ↗Sony — PS5 audio and microphone ↗Sony — DualSense connection and mute button ↗Sony — DualSense Edge profiles ↗Xbox — Night mode and controller LED ↗Xbox — Accessibility and controller settings ↗Xbox Support — Accessories app ↗Xbox Support — Controller vibration ↗Microsoft — Xbox Accessories and vibration ↗Xbox — Audio & music in the guide ↗Xbox — Wireless Controller features ↗Xbox — Elite Series 2 specifications ↗Xbox — Elite Series 2 physical trigger stops ↗Read our editorial standards