Follow the steps on your console, then tick off each adjustment. Your progress is saved in this browser.
What a good connection needs
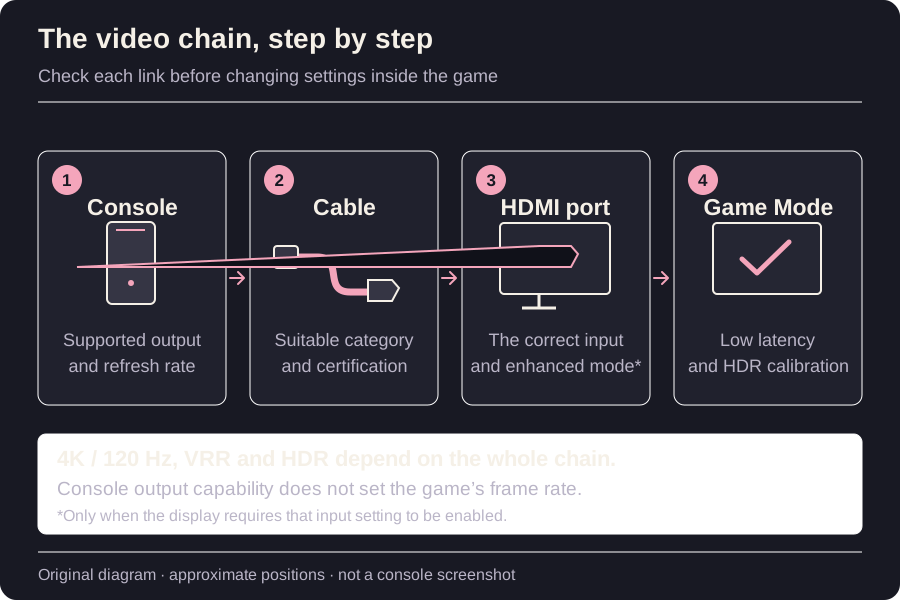
FPS tells you how many images the game produces each second. Hz tells you how often the screen can refresh. A screen that supports 120 Hz does not make every game run at 120 FPS.
VRR helps a compatible screen follow changes in the game’s frame rate. It can make those changes less distracting, but it does not fix every slowdown. Game Mode, sometimes selected automatically through ALLM, reduces display processing so your actions feel more immediate.
HDR is about showing a wider range of light and dark detail. Accepting an HDR signal does not guarantee a great picture: the screen itself matters. Likewise, a very low advertised pixel response time, often labelled GTG, does not measure the full delay between pressing a button and seeing the result.
When comparing screens, check which features work together through the HDMI port you will use. Do not assume every maximum printed on the box is available at once.
HDMI 1.4, 2.0, 2.1 and 2.2: use features, not a ranking
Version labels refer to specifications. The actual device decides which functions and signal combinations it implements. HDMI LA explicitly explains that HDMI 2.1 can include optional features and does not by itself imply FRL or 48 Gbps. That is why an affordable QHD monitor and a premium 4K/120 monitor can both mention HDMI 2.1.
For an existing HDMI 1.4 or 2.0 display, check its manual rather than assuming it is unusable or suitable for a newer mode. For a new purchase, ask directly for the resolution, refresh rate, VRR and HDR combination you intend to use over HDMI. HDMI 2.2 and Ultra96 offer additional bandwidth, not a software upgrade for the source device.
Choose the port and the cable together
Use the screen’s manual to identify its high-bandwidth input and whether an enhanced-signal setting is required. Connect directly first. For a compatible 4K/120 chain, a certified Ultra High Speed HDMI cable is a sensible choice; check its certification label rather than paying for vague gaming claims.
A working 4K/60 connection can use a different cable category from a 4K/120 connection. Cable price is not a picture-quality control once a suitable digital connection is stable. If your cable already supports your required signal reliably, buying a higher advertised category is not an automatic visual upgrade.
Identify the exact HDMI input
Find your screen’s full model number and its HDMI signal table. Pick the port listed for your intended resolution, refresh rate, HDR and VRR combination. Different HDMI sockets on one screen can have different limits.
Connect the console directly
Use a suitable cable between the console and that port, leaving receivers, switches and capture devices out for the first test. For a compatible 4K/120 chain, check for certified Ultra High Speed HDMI rather than a vague gaming label.
Check the input’s signal setting
If the screen’s manual requires an enhanced or high-bandwidth HDMI setting, enable it for that particular input. The name and menu path depend on the exact screen; use its manual.
Read the console’s capability report
On PS5, open Video Output and the connected HDMI device information. On Xbox, open TV & display options → 4K TV details. Confirm the intended combination before adding other hardware.
Establish a stable direct connection first. Keep a suitable cable that already works reliably for your required signal.
The console reports the features you intend to use and the picture remains stable in compatible content. A higher cable version number alone is not the verification.
If you cannot find it or it does not work
If a feature is absent, recheck the exact input and its signal setting, then compare with a known suitable cable. Add a receiver, switch or capture device only after the direct connection works.
Set up PS5 video output
- Settings
- Screen and Video
- Video Output
Read what the connection supports
Open Information for the Connected HDMI Device. Note the reported resolution, HDR and VRR support before changing anything. Current Video Output Signal describes the signal being sent now; it is not a benchmark of the game.
Set a supported resolution
Begin with Resolution on Automatic. For a 1440p screen, run Test 1440p Output, follow the checks on screen and select 1440p only if that is the output you want. A screen’s DisplayPort specification does not establish its HDMI modes.
Calibrate HDR in the right picture mode
Put the screen in its gaming picture mode first. Set HDR to On When Supported, then open Adjust HDR and follow the visible symbols on your own screen. Do not copy brightness-click counts from a different display.
Enable supported refresh features separately
Allow VRR and 120 Hz Output only when the console reports a suitable connection. Start with Apply to Unsupported Games off. Test each change on its own; these switches do not add a 120 fps mode to GTA VI.
Keep a reversible baseline
Leave RGB Range and Video Transfer Rate on Automatic unless you are investigating a specific signal fault. Record the settings you kept so you can return to them after an experiment.
Start with automatic signal detection, HDR only for supported content and a stable picture. Enable extra features after confirming the complete connection supports them.
Reopen the connected-device information. Confirm that the features you chose are supported, then check an actual compatible game. The home menu alone does not prove a game is rendering at 120 fps.
If you cannot find it or it does not work
If the picture flickers or drops out, undo the last change. Compare with VRR or 120 Hz Output disabled, one at a time, then check the cable, exact HDMI input and display firmware. Transfer Rate −1/−2 is a documented fault-isolation option, not a default quality upgrade.
Set up Xbox video output
- Settings
- General
- TV & display options
Open 4K TV details
Read which resolution, refresh-rate and HDR combinations the current connection reports. A missing checkmark is a reason to investigate the screen, port and cable; it is not proof that the console or game is broken.
Choose a supported output
Select the resolution and refresh rate supported by that connection. Keep automatic display detection as your starting point. Do not force an HDMI override just to expose another resolution.
Review Video modes
Under the Advanced heading, select Video modes and allow only the compatible features you intend to use. Compare VRR and high refresh separately. A 1440p/120 connection can have different Allow 4K or HDR behaviour from a 4K/120 connection.
Follow the calibration tools
With the screen already in its gaming picture mode, select Calibrate TV under Setup and follow its patterns. For compatible HDR output, select Calibrate HDR for Games under the same heading and complete its instructions on your own display.
Save the stable result
Revisit 4K TV details and note the chosen output. Check the result in compatible content. Menu wording can vary with system updates and language; the linked Xbox guide documents these controls.
Start with the detected display capabilities and a stable supported mode. A 120 Hz output setting is a hardware option, not a confirmation of a GTA VI frame-rate mode.
The requested output remains available, the screen keeps a stable picture and the required features appear in 4K TV details. Confirm HDR using compatible content after calibration.
If you cannot find it or it does not work
For corruption or flicker, compare with Allow variable refresh rate off; test 60 Hz separately. For unusual HDR colours, compare with Allow HDR10 off. If a feature stays unavailable, inspect the direct HDMI connection instead of forcing unsupported timings.
Adjust the picture and troubleshoot
On PS5, inspect Video Output and connected-device information; use Test 1440p Output when appropriate. On Xbox, inspect TV & display options and 4K TV details. Use those reports to check what the current connection actually advertises.
Calibrate HDR with the display already in the picture mode you will use. A screen accepting HDR and a screen with convincing HDR performance are different propositions. VESA certifications have defined criteria; similar-sounding marketing labels are not interchangeable. If VRR adds flicker or other instability, compare with it disabled and consult the display’s support information.
Select the console’s input and its Game Mode
Use the screen’s own controls to select its low-latency gaming picture mode. If using ALLM, check that the screen actually switches into that mode when supported gameplay begins. The exact route belongs to the screen’s manual.
Remove motion processing for the baseline
Start with motion interpolation off in that gaming mode. Keep black level, sharpness and tone mapping consistent with the display’s guidance rather than copying another model’s numbers.
Calibrate after choosing the picture mode
Run Adjust HDR on PS5 or Calibrate HDR for Games on Xbox with that picture mode active. Follow the patterns, then compare a familiar scene without changing the controller settings at the same time.
Use a stable low-latency mode as the starting point, then tune image preferences one at a time.
The screen shows its gaming mode on the console input and calibration patterns behave as instructed. Keep notes of the selected mode so later comparisons use the same baseline.
If you cannot find it or it does not work
If shadows turn grey or disappear, revisit the screen’s black-level and HDR instructions. If only VRR causes flicker, compare with VRR off and consult support for that exact display.
A short fault-isolation sequence
Change one part of the chain at a time and write down the last stable mode. A temporary loss of signal while changing formats is not enough evidence to blame a specific game.
Write down the fault and the last stable mode
Note whether you see no signal, intermittent dropouts, wrong colours or a missing feature. Record the selected resolution, refresh rate and HDR/VRR state so each test changes only one variable.
Test the direct connection
Bypass all intermediate hardware and connect to the HDMI port documented for that signal. Recheck its enhanced-signal option and the console’s capability report.
Try one controlled comparison
Use a known suitable cable first. If needed, compare 60 Hz with the previous refresh rate, then SDR with HDR, or VRR off with on, separately. A successful lower mode identifies a narrower problem; it does not prove the higher mode is supported.
Rebuild the working chain
After a stable direct test, reintroduce the receiver, switch or capture device one at a time. The device or connection that restores the fault is where to investigate supported passthrough and firmware next.
Keep the last stable configuration while you investigate. Do not force unsupported timings, colour depth or RGB range to make a checkbox appear.
Repeat the same content with the final connection. It stays stable and the capability report still lists the features you need.
If you cannot find it or it does not work
If even a direct supported mode fails with a known suitable cable, check current console and display updates, then use the manufacturer’s diagnostics for the exact model. Record which combinations work before contacting support.
Sources & editorial notes
Based on HDMI, PlayStation, Xbox and VESA documentation reviewed November 3, 2026. These are hardware setup principles, not measured GTA VI performance or a promise that every display supports every combination.
HDMI Licensing Administrator — What HDMI 2.1 claims mean ↗HDMI Licensing Administrator — Certified cable categories ↗HDMI Forum — HDMI 2.2 specification ↗PlayStation Support — Resolution, HDR, VRR and video output ↗Xbox Wire — TV setup, 4K details and calibration ↗VESA — DisplayHDR performance criteria ↗Read our editorial standards